Ask An OC Expert: Thanksgiving Crafts For Kids
Thanksgiving is a great time for families to enjoy the seasonal change and quality time with the kids. According to our expert, Linda Hunter, it is important for children to explore their environment and take a step outside in order to build an appreciation and interest for the outdoors. In order to build that interest, children may need inspiration from fun experiences like collecting objects from the nature around us to create interesting Thanksgiving crafts. Enjoy these five tips from our local Orange County expert, Linda Hunter, who has been responsible the past 13 years for coordinating the design, development and operations of Pretend City Children's Museum in Orange County.
Pretend City Children's Museum
29 Hubble
Irvine, CA 92618
www.pretendcity.org
As the Chief Operating Officer and Senior Director of Education of Pretend City Children's Museum in Irvine, Orange County resident Linda Hunter brings with her more than 39 years of experience working with children and families as a therapist. The experience as a family therapist by Hunter brings a unique touch to the children's museum, which is an interconnected city with the purpose to "build better brains" through activities including hands-on learning experiences, role playing and educational programming. There are 17 interactive exhibits and activities where children can learn foundational math, reading and science skills. The non-profit organization serves the children of the community and provides a place for them to foster their creativity.
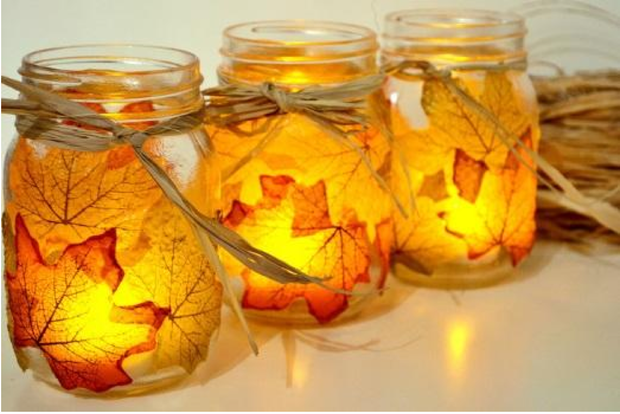
Tip 1: Leaf Mason Jar Light
"Collect colorful fall leaves and hit the craft store for Modge Podge (an acrylic sealer), a sponge brush, twine and LED tea light. Use mason jars or any glass jar with a wide mouth. With your brush (or fingers), paint a thin layer of Modge Podge on a section of the jar (testing for stickiness) and then stick on a leaf. Smooth out the edges and add more layers of Modge Podge on top, smoothing all along. Add more leaves in the same manner, overlapping them for a pretty design. Once all of the leaves are on, it will take a few hours to dry thoroughly. When fully dry, you can add twine or ribbon or raffia around the mouth. Add the LED light and you have yourself a beautiful centerpiece for your Thanksgiving table."

Tip 2: Fall Suncatcher
"Cut out two sheets of clear contact paper. Contact paper can be pretty frustrating for children to work with so I advise parents to do that part. Kids can then tear or cut pieces of fall-colored tissue paper. Peel the back off of one sheet of the contact paper and tape the sheet, sticky side up, securely onto the work surface. They can go ahead and cover the whole sheet with tissue pieces to their creative delight. When done, carefully lay the other piece of contact paper over the creation encasing the tissue paper. Trace a real leaf or draw the shape of a leaf onto construction paper for a frame and cut, holding two sheets together so you have a front and back frame. Match the front and back frames onto either side of the contact paper, glue and trim away the excess contact paper. Punch a hole and string a loop of twine to hang in windows. Pods, small pine cones or even twigs make a nice embellishment glued along the frame if you like."

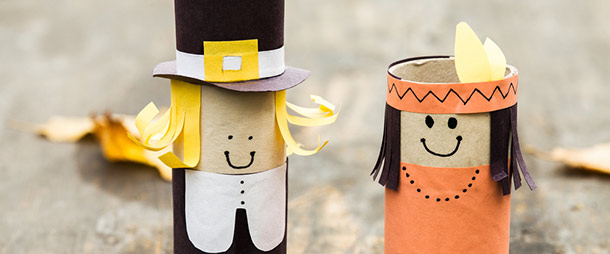
Tip 3: Leaf People Place Cards
"Using the leaves and sticks from your walks (you may have to take a few walks to collect a variety of interesting things), and some heavy cardboard (or tag board), old fabric and glue — the possibilities to create are endless with this project. Cut the cardboard to a size that will accommodate the leaf you select and the twigs needed to make a leaf person. Cover one side of the cardboard with fabric and, pulling tight around edges, glue to the back to make clean finished edges and corners. You could choose to forget the fabric and use colored tag board instead. Glue the leaf head onto the 'backing' and use various found objects to make the features. Break sticks for arms, legs, feet and hands. Be creative – remember that it is your leaf person. Write the name of your guest on a small piece of paper, glue it onto the fabric or tag board backing below the figure to make a funky, clever Thanksgiving place card for each person at the table."
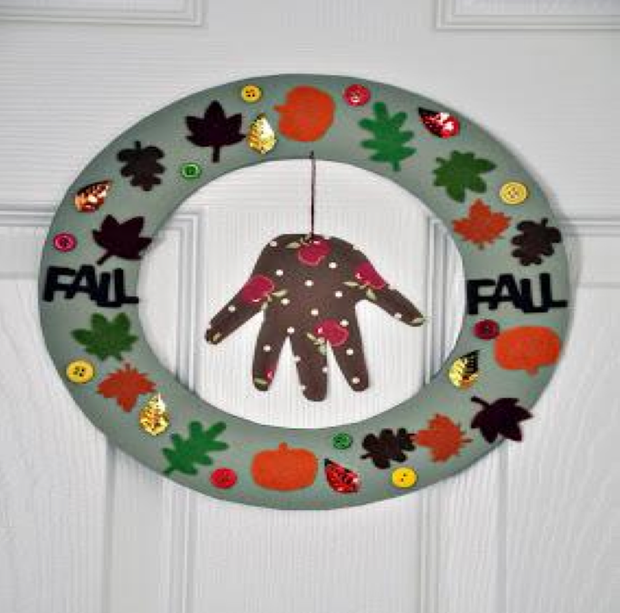
Tip 4: Thanksgiving Hand Wreath
"Using the found treasures collected on your walks and outdoor explorations, you can make an awesome holiday keepsake. You can supplement organic found objects with stickers, bits of ribbons, buttons and anything else that catches your fancy. Start with cutting out a wreath from heavy tag board or cardboard. Use a little glue, some leaves, pods, twigs, buttons and anything else you like to create your holiday wreath. For the finishing touch, trace your child's hand onto construction or scrapbook paper and cut it out to hang through the center. Not only do you have an organic wreath, but you have a keepsake of your child on this special Thanksgiving."
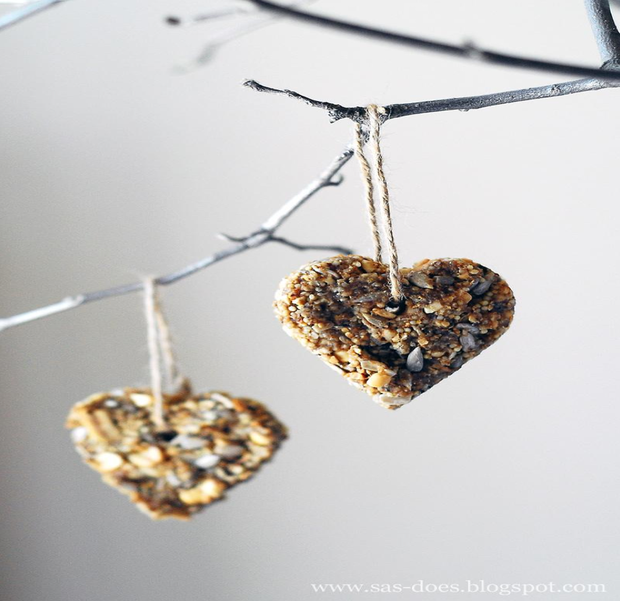
Tip 5: Bird Seed Thanksgiving Ornaments
"This last project is my favorite and it easily transfers to most any holiday. To make a birdseed ornament, you need the following ingredients: 1⁄2 cup water, 2 1⁄2 tsp unflavored gelatin, 3 tbsp. corn syrup, 3⁄4 cup flour, 4 cups birdseed (can be found at the grocery store), drinking straws and Thanksgiving or leaf cookie cutters or plastic ice cube tray. Measure and mix the ingredients together in a large bowl. Pack the mixture into cookie cutters or ice cube forms. Stick a two-inch-long section of straw through upper part of mixture to form a hole for hanging. Let set for at least 24 hours. When thoroughly dry and hard, take it from the mold, string the loop of twine and decorate your favorite tree."
Related: Best Children's Bookstores In OC